Peak To Peak Painting

How to Make a Chalkboard Wall with Paint

Chalkboard paint allows you to turn any wall into message center, calendar or art space.  Offices are the perfect place to add a large calendar.  A mudroom makes a great communication board for the family.  Kitchen cabinets can now be labeled and organized.  Even your pantry can become your running shopping list.  Plus, your kids are going to love having a wall they can write on!

How to make chalkboard

Materials Needed:

  • Spackling Paste
  • Fine grit sand paper
  • Thin Nap Roller
  • Painter’s Tape
  • Chalkboard Paint


Steps:

  1. Using your spackling paste, go ahead and fill in any holes or imperfections in the wall.
  2. Now you must the sand the wall smooth. I recommend a fine grit sand paper if you already have paint on the wall.  It will give a much nicer appearance to your chalkboard.
  3. Tape off all parts of the nearby wall you would NOT like paint on
  4. Using your thin nap roller (smooth paint roller), begin to apply chalkboard paint. I recommend the thin nap roller because it lends itself to a smoother finish (less stipple if you’re more technical).  The paint won’t spread as far with this kind of roller so be sure to go over thin spots to ensure even coverage.  Allow to dry completely.
  5. Consider sanding again to smooth wall!


What’s the Difference Between Chalkboard Paint and Chalk Paint?

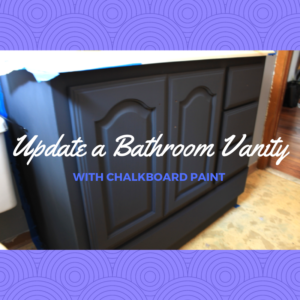
If you read through 50% of this and thought to yourself, “Aren’t chalk paint and chalkboard paint the same?”  Don’t worry, you’re not alone.  In my other article about Updating Your Bathroom Vanity with Chalk Paint, I discuss the nature and perks of chalk paint.  It is a thicker paint so it often requires little prep work and sometimes only one coat of paint!  It leaves furniture with a matte finish or it can easily be distressed with a little sanding.  It does not however allow you to write on it with chalk.

ChalkBOARD paint is another thing altogether.  You can write on this paint as if it were a chalkboard.  Sherwin Williams sells this paint for less than $12 a quart.

Additional Tips

  • Some chalkboard paint manufacturers recommend “priming” the dried and newly-painted wall with a layer of chalk before use. You then erase the chalk with a damp sponge and you are good to go.
  • Remember chalkboards and how messy they were when you were in school? That still holds true so be sure your chalkboard wall has about a foot of clearance from the bottom because anything beneath it will surely be covered in chalk.


If we can be of help with your painting project near Breckenridge, Frisco, Keystone, Vail or just about anywhere nearby, give us a call at 970 418-5368 cell or 970-547-9778 office.

Sources: Classy Clutter and Martha Stewart Online

How to Update a Bathroom Vanity with Chalk Paint

Chalk paint is becoming quite trendy as of late.  Perhaps it is its ability to adhere to just about anything or its distinct matte finish.  It can also lend a “distressed” or “vintage” look to your pieces of furniture with minimal effort.  Just take a sanding sponge to edges where paint would normally wear off and you have an instant antique!  Another selling point is that you can skip some of the prep work (sanding and priming) and because of its thick consistency, it usually covers in one coat.  It does however require an extra step once applied – waxing.  And if you are not up for all elbow grease of waxing every few months chalk paint will require, you can opt for a water-based polyurethane finish (aka polycrylics).  The waxing will create a velvety sheen whereas the polyurethane will leave it looking a little shinier.

Bathroom Vanity Chalk paint
Bathroom Vanity Picture Source: Décor Adventures

How to Use Chalk Paint

Depending on how involved you want to be in this project, you can go as far as making your own wax paint.  Details on another do-it-yourself project here, or you can save time and buy it here.  I admit I haven’t explored all the brands out there, but I know Anne Sloan was the one to create chalk paint and it typically ranks high in customer reviews.  The only downside is that is cost $35 a quart.  If you factor in that you don’t have to buy primer and that usually one coat is enough, it’s easier to swallow.  Now it is pretty thick so you can dip (just barely dip!) your brush in water and into the paint to thin it out a little.  Keep in mind though that this may force you to apply a second coat!

  1. Before you apply any paint, be sure your cabinet or vanity is free of any debris, grime or dust. I like to use a microfiber tack cloth on just about everything before I start a paint project.  2.
  2. If there are any big dings in the cabinet, fill with a little wood filler and sand so it’s flush with the rest of the cabinet before painting. Also remove any hardware you don’t want covered!
  3. In a well-ventilated room or outside, select a brush about two inches wide and apply your first (and maybe last coat). Make sure you tape off areas you’re worried you might spill paint on and parts of the furniture you do not want painted.
  4. Allow ample drying time (about two hours) before applying a second coat. If you determine it does not need a second coat, then this is where you decide if you’re going to put a wax finish on it and buff or polycrylic finish and sand.
  5. Buff or sand for the last time. Replace hardware and you’re done!


To Wax or Not to Wax?

Painted Vintage had some good advice about what kind of wax to use if you are not daunted by the extra work. The author suggests Minwax Paste Finishing Wax because it is easy to find and work with.  It also results in a nice finish. If you need to use a darker wax, he suggests using Annie Sloan Soft Wax.  Downside is that once you commit to waxing, it’s pretty hard to get out of it.  Meaning you can’t just put a coat of polycrylic over wax since it’s water-based and wax repels water.

If you choose to go the equally-respectable clear sealer route, there are lot of choices available.  I’ve recommended it before and I’ll recommend it again: Minwax Wipe-On Poly is great for a project of this size.  If you have a huge vanity or are painting a bunch of cabinets, then buy the kind you can brush on.  Be sure to apply the brush on Poly using long even stroke taking care not to go back and forth.  When you go back and forth with the brush, you can gunk it up and leave the finish looking lackluster.  The downside to polyurethane finishes is that you need to (should!) apply two coats and you must allow the first coat to dry for a few hours, sand, and then repeat.

If you find yourself interested in a final product like this but do not want to break out the brushes yourself, we are here to help!  We have a dedicated crew ready to travel anywhere from Breckenridge, to Keystone, to Vail, to Evergreen and beyond.  Call us now at 970 418-5368 cell or 970-547-9778 office.

Don’t Neglect These Spring Home Improvement Projects

With recent snow here in Breckenridge and the threat of more coming, Spring may seem like a pipe dream.  As we approach it, not only will snow melt and mud appear EVERYWHERE, but rain and wind will come.  If you are not careful, this can wreak havoc on your home’s siding, roof, deck, windows, and more (assuming Winter has not done so already).  Here’s what to do to mitigate damage and prevent new problems from interrupting your summer.

Spring Home Improvement Projects

Repair Roof Shingles

Assuming all the snow has melted from your Colorado roof and it is not lightning and thundering outside, you can properly assess the damage.  Using a pry bar or crow bar, remove old or loose shingles.  Read here for step-by-step instructions.  Be sure to buy a quality shingle cement or adhesive and good roofing nails for the job!

Check Seals around Windows

Old homes especially have an issue with moisture around windows.  Most New Construction homes use double pane windows that are fairly-well insulated on their own.  Whichever your circumstance, check for warped wood or mold and moisture in between panes.  This will likely indicate the need for new windows and/or trim. If you escaped with minimal damage to your windows, do yourself a favor and replace weather stripping or old caulking.  You only have to do this every few years and it only takes a few minutes!

Decks and Patios

Now that the weather is warming up, ensure your outdoor spaces are ready for action again.  Look for loose or warped boards on your deck or patio.  Also, look at the seal or stain.  Is it chipped, faded or cracked?  Now is the perfect time to re-seal it!  For a tutorial on how to properly clean and re-seal your deck, read here.

These are typically some of the more-neglected Spring Home Improvement projects because if left alone too long, the repair work needed becomes intimidating.  If you are at all intimidated or just too tied up to do the work yourself, we are here to help!  We have a crew ready to travel anywhere from Breckenridge, to Keystone, to Vail, to Evergreen and beyond.  Call us now at 970 418-5368 cell or 970-547-9778 office.

Save

The Proper Paint to Use in Every Room of Your House

As a professional painter, I am able to quickly rattle off what kind of paint would be most suitable for a project because I’ve been painting for over 25 years.  I understand though that most homeowners who either employ someone like myself or do it entirely themselves would like to know more about what they are buying.  Please do not feel obligated to memorize this guide as most paint stores will have staff that can reinforce what I am telling you here, but let is serve as something you can refer back to for your painting projects.  I will also suggest some brands that I’ve relied on over the years that consistently perform.  Picking the wrong paint could mean you have to completely repaint so don’t just shrug this off!  Without further adieu, here is a room-by-room guide on what type of paint to buy for each room in your house.

Proper Paint for Every Room

For the Kitchen: A high-grade washable latex satin or if you are on a budget, a semi-gloss latex.  If you don’t like shiny walls, go with the higher-end washable satin coating.  Of course, the shinier you go, the more washable it is.  Emerald or Duration are great paint brands for this purpose.

Trim, Doors and Cabinets: Go with a latex enamel, semi-gloss is typically recommended because it is the most washable.  Consider this sheen for all the higher-traffic areas of your home.

Living Room & Bedrooms: Any satin or egg shell finish.  I personally recommend Harmony for zero VOC (volatile organic compounds).

Bathrooms: Much like my recommendation for kitchens, I suggest using a high-grade washable latex satin or a semi-gloss latex.  Anti-microbial paints are recommended for bathrooms due to moisture.  They inhibit the growth of mold and mildew.  Duration and Emerald have these characteristics included.

Ceilings: A dead-flat or “matte” finish.  I say this for any wall/room/ceiling that has anything to hide.  Flat sheens are great because they absorb light rather than reflect it so they draw less attention to imperfections.  A good product is Eminence as it has self-priming characteristics so you can put it over raw drywall or newly-textured ceilings.  This product also has anti-microbial characteristics.  Flat finishes are recommended because they don’t reflect light as much.  Ceilings tend to catch the most light.  Show less imperfections and less flashing.

New Drywall: You can use a drywall primer and then use any of the interior paints recommended above or you can use a self-priming coating (paint and primer in one).  Sherwin carries a brand carries two brands that accomplish this: Super Paint and Cashmere.

If we can be of help with your painting project near Breckenridge, Frisco, Keystone, Vail or the like, give us a call at 970 418-5368 cell or 970-547-9778 office.

Sources: A Sherwin Williams Manager and TheSpruce.com 

Save

Save

Save

Easy Winter Projects to Brighten Your Mood

It seems these winter months just drag on, but don’t let them!  If you are tired of sitting around waiting for the sun to come out, I’ve got some ideas for you.  Home projects will not only give you something productive to do, but they can and WILL lift your mood.  If you’re like most people, you may get frustrated during your project.  Take heart though because once you have seen your “new home,” you will be elated!  Some of these projects will even save you money and what’s a better mood maker than that?

Easy Winter Projects


Here Are 7 Easy Winter Projects to Brighten Your Mood:

  1. Repaint

You had to see that one coming!  It’s not just a shameless sales pitch to get you thinking about hiring us for paint.  Whether you do it yourself or hire someone, a nice new paint job will make your surroundings fresh again.

  1. New Lighting

For less than $100 you can buy a new light fixture and change the whole atmosphere of your kitchen, dining room, you get the gist.

  1. Patch Holes in the Wall

Holes in the wall are not only unsightly, but they are also inefficient.  Saving a few more dollars every month on heating will probably not have too much of an effect on your mood, but making your home look more complete in less than a few hours will! With a little putty knife and drywall compound, you can fix almost any imperfection.  For larger holes, you can apply a drywall patch and follow up with compound.

  1. New Kitchen Backsplash

With the new innovations in tile, mortar and grout, installing a new backsplash has never been easier.  Mortar and grout dries faster these days and backsplashes come interconnected most of the time so it’s almost impossible to screw it up!

  1. Swap Out Interior Doors

It is common in new construction for homes to have hollow interior doors.  Do yourself and your houseguests a favor by opting for a solid-core door to cut down on noise throughout your home.  It’s also a great opportunity to upgrade your style.  Assuming you measured correctly, the whole project should take less than an hour!

  1. Upgrade Flooring

With all the snow we track into our homes, you may pay more attention to your floors.  Why not finally pull the trigger and replace them?  Laminate and manufactured hardwood floors are an affordable way to have your whole home looking stylish.  There are so many alternatives to the expensive tiles and hardwoods ten years ago so now is the perfect time to polish up your home and increase its resale value.  Not to mention, new floors will probably put a smile on your face.

  1. Replace Hardware on Interior Doors or Kitchen Cabinets

It’s a frustrating truth in life that things go out of style quickly.  Especially with rapidly changing home trends.  A lot of older kitchen cabinets and interior doors have gold or brass fixtures.  Switching to polished chrome and aged bronze will create a more timeless look and more importantly – an affordable one!  For around $200, you can have your kitchen cabinets or interior doors looking more this decade.  This is a great update on interior doors, too.  Take it up a notch and replace door hinges, too.  And if you are an expert DIYer, read about how to spray paint your handles to save even more money!

If you live in Breckenridge or nearby Summit County, give us a call at 970 418-5368 cell or 970-547-9778 office for assistance with just about any home improvement/painting project.

Sources:

http://www.moneycrashers.com/home-improvement-projects-upgrades-winter/

Winter Home Hacks to Save You Money

Colorado is cold in the winter and especially this January and February.  Keeping your house warmer does not mean you must install new windows or a new radiator in your home.  You can make simpler, cheaper fixes and have your home feeling more comfortable in a snap.  Here are some hacks to save you some shivering and money this winter.

Winter Home Hacks to Save You Money

Thicker Curtains

Believe it or not, but using curtains with a thermal lining will keep warm air from escaping out your windows.  Thicker curtains make it more difficult for heat to escape so don’t be afraid to go too thick.

Let the Sun in

Speaking of windows, don’t forget to open those thermal curtains when the sun’s out.  This will allow more warmth into your home.

Rotate Ceiling Fans

Being in Summit County, we do not have much need for air conditioning so we often rely on our ceiling fans and open windows.  Well, those ceiling fans can help circulate warm air in the winter, too.  Just remember to flip the switch and have them spinning clockwise to pull warm air up.  If it’s pushing air down at you, there’s your clue.  Also, keep it on its lowest setting in the winter!

Rugs, Runners and Carpeting!

Not only will your feet fill warmer, but adding carpet runners and rugs throughout your home will add an extra layer of insulation making your home extra warm.

Add Trim

Some homes are perfectly sealed up without trim, but for most of us, there is a small gap between the wall and the floor that often allows a lot of hot air to escape.  Trim and molding around ceilings will help mitigate this.

Caulking

This may seem like an insignificant difference, but it’s not!  After years of exposure to changing temperatures, changes in moisture, etc. the interior and even exterior caulking can grow worn and cracked.  This will allow your warm air to leak out of your windows and doors.  Done right, a new application will keep your windows and doors sealed for a few years.

Patch Holes

This follows the same logic as a reapplying caulking to your home’s interior and even exterior.  If you have holes on the inside or outside of your home, remember that they are not just unsightly, but vastly energy inefficient.  Patch those babies up and you may also prevent unwanted houseguests from coming in!

Add Insulation

I left this one for last because it can seem like the most daunting.  After all, no one likes crawling into their attic, crawlspaces and basements to test their fear of small places all while carrying itchy insulation.  If your home is poorly insulated though, you are going to want to do this first!  You would be surprised how much energy you could save just by thoroughly insulating your home.

Don’t go cold this Winter!  If you live in Breckenridge or nearby Summit County (Frisco, Silverthorne, Keystone, Dillon, Evergreen, Vail, Beaver Creek, Avon), drop us a line or give us a call at 970 418-5368 cell or 970-547-9778 office for assistance with insulation, drywall patching, trim work, painting of any kind, etc.

Painting Indoors?  Try These Painter-Approved Tips

As the temperature drops outside, so does the potential for exterior painting.  In Breckenridge,  we work with are high quality Sherwin Williams paint that can be applied at temperatures as low as 35 degrees.  So if you have a small indoor paint project you want to tackle yourself, at least allow us to offer you some advice.

Prep the Wall

Before you paint, it’s important that your surface is prepped.  That means every hole, crack, dent is filled, patched and/or sanded.  After the walls imperfections are hidden, consider priming.  If you have new drywall, this is a MUST.

Know How Much Paint You Actually Need

Wasting paint is no fun.  Instead, measure the perimeter of your room, then the height of the wall.  Multiply the two numbers together and you have a pretty good estimate of how much square feet you need to cover.  Subtract some for large windows and doors or parts of the wall that will require little to no paint.  One gallon of paint covers about 300 square feet with one coat.  Double this if you’re working with a lower quality paint or if you know you’re going to need two coats (darker color, more imperfections to hide, etc.).

Test the Color

I wish I could take credit for this idea, but I saw it on the DIY Network – take a piece of foam board or a canvas and paint it in the color you are trying to decide on.  Grab several boards if you’re considering a few colors.  This will allow you to hang the color directly on the wall and move it around as you like.

Invest in Higher Quality Painting Materials

If you are not going to hire out painting help, consider spending some extra money on canvas drop cloths.  Professionals typically defer to this because it is less hazardous to work on and it absorbs spilled paint really well so you don’t have to worry about it slipping off plastic.  Some other materials to consider: an extension pole and a paint grid.  Depending on the size you get, an extension pole could mean little or no time on a ladder.

Paint grids are a strong recommendation as well because they offer better paint application than your typical paint tray.  Most people inevitably apply too much paint to their roller cover and/or make a huge mess using a paint tray.  A grid will allow you to drop it into a five-gallon bucket.  When you’re done painting for the day, you can just put a lid on the bucket to store the paint for later instead of trying to salvage your paint tray.

We are pretty liberal with our advice, so please don’t hesitate to drop us a line or give us a call at 970 418-5368 cell or 970-547-9778 office.  If you live near Breckenridge, we can do the work for you!


Outdoor Paint Projects You Can Finish This Weekend

Summer is winding down, but it’s not over!  Even though Pumpkin Spice Lattes are officially available again, it’s still not fall! A common misconception about painting is that once summer is over, exterior painting is a no-go.  Not so!  Fall can be a perfect time to get outside and paint with more desirable temperatures.  With improvements being made to paint, you can paint with most paints around 40 degrees and with premium paints such as Sherwin Williams’ Duration and SuperPaint, you can paint successfully as low as 35 degrees. Granted, it is cooling down outside so you may want to wrap up any outdoor painting in the next few weeks.  Here’s a list of what you can finish up quickly (most projects are an hour max)!

Outdoor projects you can finish this weekend

Metal Fire Pit

As I was saying before – summer is not over yet!  Even if you’re convinced it’s fall, you are probably going to be breaking out the fire pit a lot in the coming months.  So why not spend an hour making it look brand new again?  Just make sure you choose a paint specifically engineered for high heat conditions.

Paint your firepit
Image Credit: Instructables.com

Mailbox

Although it’s tiny, a mailbox located right outside of your front door or end of your driveway makes an impression.  If it’s weathered or boring, a new color will at the very least make you smile every time you see it.  You can even paint a funky polka dotted mail box.  It may even cheer up the mailman!

DIY Pola dot mailbox
Image Credit: CrapIveMade.com

Front Entrance

If something as small as a mailbox makes an impression, then you can be certain a stairway entrance, gate or the entry way to your front porch will, too!  Repainting your stairs up to your porch, the staircase railing, or the trim around your entryway can make a world of difference!

Front Door

Go the extra mile and give your weathered front door a new coat of paint, too.  For full instructions on repainting your front door, read here.

Paint Front Door
Image Credit: Frontdoorcolor.com

Patio Furniture

With a fire or a sweater, you can enjoy your patio furniture for at least another three months.  Unless you live in Breckenridge like we do – than evenings spent outside are never a guarantee.  And even if you intend to put it away until next Summer, it never hurts to put a fresh coat of paint on it to protect it from moisture and other elements if you’re not storing it in a climate-controlled environment.

Exterior Trim

Starting from the furthest edges, use a paint brush to repaint trim.  Following yourself with a washcloth to clean up paint outside the lines will prove a lot easier than taping it off.

Shutters

You do not have to repaint your home’s whole exterior to get a refreshed look.  Though if you want to, let us know!  Painting your wood or vinyl shutters can make you’re the windows around your home really pop.  You can paint these pretty easily even if you have vinyl shutters – just be sure to look for a paint or spray paint that adheres well to plastic surfaces.

painted shutters
Image Credit: ThisForAll.net

House Numbers

The best for last – the smallest project of all!  Painting your house numbers (your street address) can be done in ten minutes or less.  Simply take numbers down with a screwdriver, lay them over a tarp or blanket you don’t care about and spray paint them a contrasting color (one that contrasts with the background their affixed to).  Give them ample time to dry and reattach.

If you are in the Breckenridge area and need additional help with your exterior or interior painting project, please lean on us to help!  We love painting!  Call us any time at 970 418-5368 cell or 970-547-9778 office.

“The Best Paint Colors for the Small Rooms in Your House”

You may think you have got this all figured out – paint a small room white to make it look bigger! While that advice is not necessarily wrong, it is not complete. Yes, lighter colors will reflect more light and darker colors will absorb it. Consider this though: it may not be everyone’s endgame to have their small room look bigger. They could actually like the size it is! Here’s some advice on how to pick paint colors for the interior of your home to accomplish just about anything!

Best Paint Colors For Small Rooms

White is Not Your Only Option

It’s true, white walls will open up most rooms and make them look bigger, but you are not limited to stark white. There is a plethora of choices in the white color palette. You can choose different shades ranging from bright white to cream. You can also find whites that have blue or pink undertones to them making the room feel

Look at Your Ceiling

Most people assume bright white is the best choice for their ceiling, but pale blues, creamy whites and off-whites can lend a very classy look to your neutral-colored walls and actually make the ceiling feel higher.

Don’t Forget About Your Trim

You can really amp up the look of your light-colored walls with bright white trim and doors. Painting trim and molding in a lighter color will make the walls appear further away and really open up the space.

Use a Color Combination

Color combinations will help break up the monotony of an all-white room. Also known as a monochromatic paint scheme. Do this by painting your walls, ceiling and trim in different shades of the same color. The room will look uniform and spacious, but the different hues will add depth to the room!

monochromatic-bedroom-design
Photo by: Decoist.com

Don’t Buy the Cheap Stuff

This one branches a little off topic since we are technically not talking about color. When buying paint, choose the quality stuff that you have to pay a little more for. Not only will it last longer, but it will have a better sheen to it that will reflect more light. Now I’m not telling you to go run out and buy high gloss for every room in your house, but eggshell and satin will allow light to reflect off whatever paint color you choose and make the room look bigger. A nice trick I’ve seen work well is painting the walls in satin and the trim and molding in semi-gloss to make the room look bigger.

Make Your Small Room Cozy

If you appreciate the quaintness of your small room, embrace it!  Sometimes you want your bedroom or bathroom to feel small, private or more romantic.  Rich browns, warm reds, deep blues, grays and even gold will make anyone feel right at home.   Use sharp colors if you are concerned about the room seeming too small and consider offsetting it with crisp white.

Warm colors for a cozy bedroom
Photo by: HGTV

Picking paint colors is a lot harder than you think.  Don’t hesitate to seek help if you would like advice from experienced painters on picking colors, painting, hanging drywall, etc.  If you are near Breckenridge, you can contact us at any time.  No job is too small or too big.

“The Worst Advice We’ve Heard About Painting Your Home”

Much like when you tell people you are expecting a child, people cannot help but offer their two cents when you tell them you are painting your home.  Do-It-Yourself painting is tricky so it makes sense that people want to share their shortcomings or shortcuts, but what people fail to understand is that painting a house is truly a craft.  Professional painters have spent years perfecting what they do, so 9 times out of 10, you will get a better result by hiring one instead of doing it yourself.  If you choose to do it yourself, please heed the advice of this longtime professional painter!  Here’s a just a handful of some of the worst advice we’ve ever heard about painting:

Worst Advice About Painting your home

“Just wear a mask when dealing with lead paint.”

This one drives me NUTS.  Why do people not take their health seriously?  There is a reason there are waivers that sign your life away when you move into homes or apartments built before 1976.  Lead paint is no joke.  I am not going to tell you how to live your life, but if you’re not comfortable with the intensive care needed to remove lead-based paint, please enlist the help of a certified professional painter.  Wearing a mask is just the tip of the iceberg.

“You don’t need to move any furniture – just cover it all in plastic.”

There is a reason you see furniture pushed out of a room or to the center of a room when you see a paint crew at work – they do not want to get paint on your stuff!  And they are pros!  Drips and spills happen.  Do yourself a favor and move knick-knacks, electronics, smallish furniture, light fixtures and anything you care about to another room.  Then move your large furniture to the center of the room and cover it in thick plastic or in two sheets of plastic.  Plastic will help mitigate paint damage, but it’s not 100%.  It simply does not do a good job of absorbing paint.  If you are replacing drywall or doing any drywall repair at all, remove EVERYTHING and cover carpets in thick, high-quality canvas drop cloths because that mess gets EVERYWHERE.  Bed sheets and old blankets will let paint and drywall dust get through.

“All paint is the same!”

No matter what Home Depot tells you, what you spend does make a difference.  And by the way, no paint is perfect after one coat.  If you are going to do the job right, use a good primer, pick a quality paint and do at least two coats.  Most quality paints are around $25-$35 a gallon.  They are usually worth it though because they hold up for years.  The $15 a gallon paint looks good for a few months, but will often crack, peel and fade much faster.

“You’re safe to use that leftover paint in another room”

The shelf life of paint all depends on storage conditions.  Was the paint stored in a cool, dark room?  Did it get sealed properly?  Has it ever been exposed to temperatures where it might freeze?  Painters will recommend you hold onto a small amount of leftover paint for touch ups but using that paint in another room entirely is not always advisable.  The thing is, you never know what a paint color will look like until it’s completely dry and examined in natural light.  If the rooms face different directions, they will look like different colors in the sun.  Another key takeaway is whether or not you have enough leftover paint to cover the room.  If you’re not sure you do, be sure to check with your local paint store to see if that color is still in stock or if they are able to match it.  That would be a tragedy to exert all the effort in painting a room only to have to redo it.

“You can use interior paint on the exterior of your home.”

Now you may get away with using a good exterior paint on interior surfaces, but never the other way around.  Exterior paints are formulated differently these days to offer protection from the elements.  They are more resistant to UV rays, rain, snow, dirt, etc.  This means they are less likely to peel, bubble, crack and fade away.  You will be so disappointed if you try to use an interior paint outside!

If you got involved in a painting project that you no longer want to be a part of, give us a call.  We can handle any residential or commercial painting project.  We actually like what we do.  If you are near the Breckenridge/Summit County area, we would love to ease your burden.  We can be reached at: 970-418-5368 cell or 970-547-9778 office.