Peak To Peak Painting

How to Choose a Paint Color for Your Kitchen

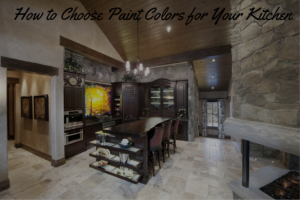
When looking at rooms in your house, your kitchen and bathroom are your most prominent rooms and/or the largest selling points of your house.  Knowing that, you probably want to spend more time contemplating what color you paint them.  Working on your kitchen, you probably recognize that there are lots of elements you should consider in order to create a seamless look with the rest of your house.


Paint color for kitchen
Photo credit: Trilogy Builds

Pick Features You Like

Find things that inspire you from colors to certain pieces or elements you liked on a tropical vacation for example.  If you’re concerned about the flow of the house, try to tie in elements or similar tones found throughout the rest of the house.

Ask Yourself What You Want to Feel

When you walk into your kitchen, do you want to feel energized, relaxed or a mix of both?  Figuring out the atmosphere you would like to achieve will help you determine your color palette.  Choose warm colors like red, yellow, oranges to create an energizing vibe in the room.  If you’re looking for a more relaxing room, choose more cool colors such as neutrals and grays.

Consider Cabinets

Cabinets are often the first thing you see when you walk into a kitchen.  If you really want them to pop and become a sharp focal point in your kitchen, choose a color that will contrast well with your walls.  The best thing you can do is get sample colors and paint the corners of your cabinets and let it sit for a few days to see if you can live with it.  If your cabinets need an update, a classic option is to paint them a shade of white.  Painting them white creates a relaxing feel that complements just about anything, but choosing dark brown or black can lend itself to a more country or elegant feel.  If they are in decent shape and you like the look of natural wood, you may consider a new stain or clear coat.

Examine Light

Natural light changes throughout the day and depending on the direction your room is facing the sun, the room can look very different every hour.  Artificial light can create a different feel when paired with a paint color depending on the type of bulb you have.  Incandescent lights make your warmer colors more vivid and fluorescents make blues and greens sharper.  If the room is painted in a black hue, remember that blacks absorb all colors.  If you think you may want to paint your room white, remember that white absorbs hardly any.  Lastly, blues absorb red light.  Every paint color looks different depending on the amount of natural or artificial light.  

Use Color to Differentiate Spaces

If you have a small breakfast nook or dining area that shares the space with your kitchen and you would like to create a feel of a separate zone, use a color within the palette of the room (e.g. if you are using browns, consider using a cream or gray to separate your space).  Conversely, you can choose a color completely opposite of the rest of the room and really make that space stand out.  If you want to accomplish this while still making that zone look like it belongs to the rest of the room, consider adding colors that match the room and implementing them in furniture and décor in that separate space.

Test Drive Colors Before You Commit

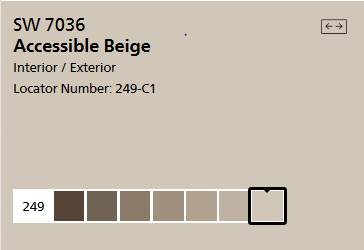
This is not marriage advice!  I am strictly referring to testing paint samples, people.  Buying samples is always a popular route to go.  If you want to save yourself the confusion of conflicting colors on your wall, Expert Color Consultant, Paulette Diamond advises using canvas boards you would find at any art store, painting each individual board in one of the colors you are considering and looking at them one at a time.  By doing this, you can look at one sample at a time, move them around and leave your walls intact.  And always remember that paint is easily swapped out if you decide you are not happy with it!

If you are in the Breckenridge area and need additional help selecting colors or with any painting project, please lean on us to help!  We love helping with colors!  Call us any time at 970 418-5368 cell or 970-547-9778 office.

Breathe New Life Into Old Patio Furniture 

After a long winter in Breckenridge, your patio more than likely has taken a beating from sun and snow.  If you are responsible, maybe you put away your patio furniture in storage.  But if you are anything like me, you put that off and your furniture suffered a little.  Do not fret yet, though!  You more than likely are still be able to revive it following these steps:

Old patio furniture made new


Washing and Scrubbing

Using a soft plastic brush to prevent scratches, scrub furniture to restore it back to its natural sheen.  A mixture of water and a bit of vinegar (1 cup of vinegar to 1 gallon of water) is gentle enough to clean most wood, metal and plastic furniture.  When working on furniture that shows streaks easily (such as teak), work on scrubbing from the bottom up to avoid leaving drip marks on furniture.  For rusted metal furniture, use a wire brush to remove built up rust then follow up with a good sanding to remove the rest.

If your furniture is a little hardier, a pressure washer or hose with spray attachment might do the trick to  remove dirt and dust from furniture bases and cushions.

Sanding

Most furniture can benefit from a good sanding.  A lot of tutorials out there say you can get away without sanding, but if you want to paint your furniture, you need a light sanding (150 grit paper should do it) to help primer adhere to it.  Double check if you have specific wood you are concerned about, but a light scuff sand can revive most wood furniture and allow it to accept paint or stain.  A light sanding is even capable of removing wine and coffee stains.  For metal, sanding can remove a good layer of rust.  If you did sand, make sure to use a tack cloth or a solvent like acetone to remove remnants before following up with primer and paint.

Oiling and Staining

If you have tired-looking wicker furniture, consider treating it with tung oil to restore it to a new shine with protective properties.  Tung oil is often the oil of choice for restoring teak furniture.  Though always thoroughly clean your furniture before applying tung oil.

Reupholstering

With fabric and a staple gun, you can reupholster old cushions.  If you take your old cushion to the fabric store, they will even help you determine how much fabric you will need.  If DIY reupholstering is not your cup of tea, consider using a slip cover instead!

Prime It

If you want to avoid painting your patio furniture every few months, use a primer to keep the paint from peeling off.

Painting

Before painting your plastic, wrought iron, wood or metal furniture, give furniture a good wash and dry.  Or again use a fresh tack cloth to remove dust and debris. Use a foam roller to apply multiple coats to furniture and a foam brush to hit the nooks and crannies the roller cannot reach.  Not only can paint fix a plethora of issues with your furniture legs, arms and tables, but it can also extend the life of faded cushions!  Using spray paint, just apply like you would to a hard surface.

Protect It

A new foam roller will be needed here!  If you want to add an additional layer of protection, apply a thin coat of water-based gloss.  The thin layer ensures you avoid bubbles.  Give it ample time to dry and enjoy your like-new furniture!

Please let us know in the comments below or by email how your project turned out! We love pictures!  If you need any assistance at all with your painting or wall covering project and you live in the Summit County area, call for a free in-person estimate at 970 418-5368 cell or 970-547-9778 office!

Picking Paint Colors to Make Your Home Worth More

If you want to command top dollar for your home, you may want to consider staging it.  Staged homes often sell better and for higher dollar because they look less lived-in and allow the buyer to view the home as a blank canvas.  It will also help your home photograph better if you plan to post pictures online.  Staging your home will likely include removing elements of your style and really neutralizing colors.  Painting is an inexpensive way to give your home a fresh and appealing look.  When most people hear the word “neutral,” they conjure up images of dull white and beige colors.  That’s not what I’m talking about here.  You are not limited to white and beige – although there are many different hues in these two colors.  It’s hard to go wrong with white, but with a little knowhow you can venture into greens, browns and grays to really highlight your home.

paint colors to make home worth more money

Before taking this advice and running with it, consider the look and feel of the neighborhood.  If you are thinking about repainting your home’s exterior (which I highly recommend since it will likely be the first thing they notice), you will likely want to remain within the color palette of the neighborhood.  You do not want to be the one yellow house in a neighborhood full of grays and browns.  You may also consider repainting the roof to complement the new exterior.  Beige is often a popular choice here because it blends in with surroundings, but consider the style of the house.  Bolder designs often warrant bolder colors.

When considering colors for the interior of your home, think of earth colors.  I’m talking about blues, browns, oranges and greens.  These colors are often warm and relaxing to a potential buyer.  Contemporary colors like gray are really popular now, but they are hard to live with if it is too blue or pinkish.  You are better off choosing a lighter tone than was popular for the last 10 years.  Beige is a safer bet and is a combo of tan and gray.  I really like Accessible Beige and Loggia (pictured below).  These are Sherwin Williams Colors.  Accessible beige was popular among interior designers for the last three years.

accessible beige sherwin williams colorLoggia Sherwin Williams Color

As an added bonus, Sherwin Williams has also designed an Android and iPhone app called ColorSnap® that allows you to turn real world colors in to paint color swatches instantly. Color to Go® samples are another alternative from Sherwin that will allow you coverage of about 75 square feet to really determine if you can live with the color in the selling process.  Remember, even if you find a color you think you really love, it can always look dramatically different in natural or artificial light.

If you are in the Breckenridge area and need additional help selecting colors or with any painting project, please lean on us to help!  We love helping with colors!  Call us any time at 970 418-5368 cell or 970-547-9778 office.


How to Clean your Deck – Without a Pressure Washer

Yes, pressure washers are amazing, but they can also be amazingly expensive. For deck maintenance, you can manage without and with the help of a good quality deck wash and sturdy scrub brush you can get some impressive results! And unlike a pressure washer, you won’t have to worry about gouging your deck due to excessive water pressure. Living in Breckenridge, the sun and snow makes our deck take a severe beating year round. Unfortunately this means more maintenance than we might like to prolong the life of the wood and keep it looking good. Read on to find the best ways to maintain your deck without a pressure washer.

Materials needed:

  • A good quality deck wash (I recommend Super Deck Wash or TSP) – often found at a local paint or hardware store
  • Long handled scrub brush with stiff bristles (Though not necessary, you can even find these stiff synthetic bristle brushes with hose attachments so you can hose the deck and brush at the same time.)
  • 5 gallon bucket or mop bucket – to mix your deck wash according to instructions
  • Hose with garden sprayer attachment
  • OPTIONAL: Gloves for mixing deck wash solution, re-sealer/stain (see below for notes on type you should get for your deck) & oil brush to apply stain, mineral spirits to clean oil brush

Step 1

First things first, remove all furniture, potted plants, barbecues, etc. and ensure large debris is removed or swept away.

Step 2

Mix the powdered deck wash according to instructions on the box into a bucket of your choosing.

deck brushStep 3

With your hose and garden sprayer attachment, wet a 4 by 4 area.

Step 4

Using your mixed deck wash and stiff, long-handled brush, begin aggressively scrubbing the 4 by 4 area. To your delight, you will see dirt lift up and the water become dirty.

Step 5

Continue working in 4 by 4 areas until the deck is complete. Be sure to rinse and scrub as you go.

Step 6

Give your entire deck one final rinse and allow the deck to dry completely. If you are not planning on resealing, feel free to replace furniture, barbecues, etc.

The next steps are optional. If you live in Summit County or other high area elevations, I would definitely recommend resealing once a year or every two years – especially after a good scrubbing!

oil brushStep 7

Getting on your hand and knees and using your oil brush, apply one coat of the deck sealer of your choice. It is important that you do not allow the stain to pool. Also look out for drips on nearby concrete, painted trim, siding etc. Once you’re done applying deck re-sealer, clean your oil brush with mineral spirits.

Step 8

Always follow manufacturer instructions, but most deck re-sealers will allow you to safely resume light foot traffic on your deck after 1-3 days.

Special notes on deck re-sealers and stains:

For old decks where the wood is at the end of its life, you’re better off choosing a solid body stain. This will be one solid color that will offer more UV protection. It looks like paint, but it allows moisture in and out of wood and allows the wood to breath. Paint isn’t really designed to stick to wood and instead often peels.

Semi-transparent stain/sealers are good for newer woods where you want to emphasize the natural beauty and grain of the wood. Clear sealers are good for people who want to leave their natural wood as is. This route though is high-maintenance as it often requires you to re-seal annually and there is not a lot of UV and moisture protection.

We hope this article summed up how to wash your deck properly. Please let us know with pictures or comments how your experience went. For further questions, feel free to comment below!

Spruce Up Your Interior Stained Wood Work

There are many advantages to using wood for your window sills and doors.  Besides offering a beautiful look, wood is an excellent insulator.  Trouble is, wood is more vulnerable to scratches than most man-made alternatives.  If you have stained wood work in your home that needs a little time and attention to look like new again, do not fret.  You would be surprised, but scratches, worn-out window sills, dingy door edges, and wood that lost its sheen are all relatively easy repairs.  Today, we want to show you how to restore your stained wood to look new again!

diy-staining

For this project you will need: a fine sanding sponge, a touch up stain of similar color (Minwax Wiping Stain or stain left over from construction), Minwax Wipe On Polyurethane, two clean rags and/or tack cloth.  Optional: Gloves for applying stain and polyurethane.

Notes: When using a rag to apply stain, the more stain you apply and the longer you leave it on to dry before wiping off the excess, the darker the color will be.  It’s best to test a spot by lightly applying stain and immediately wiping off to get an idea of how dark it will be.  It’s easier to add more stain later than to strip it off!

Step 1

With your sanding sponge, lightly sand scratches to clean things up and flatten out grooves in the clear coat.  Take care not to sand too far into the stain color.  You just want to sand down to the clear coat.

Step 2

Using a clean rag or tack cloth, remove all dirt and dust from wood.

Step 3

Using your similarly-colored stain and a clean rag, wipe on your first coat of stain.

Step 4

Wait at least 10 minutes for first coat of stain to dry completely.  Optional: Lightly sand with sanding sponge before applying second coat if you want an extra-smooth finish.

Step 5

Apply second coat of stain and wait 6-8 hours.  Optional: You may wish to sand again after about 15 minutes of allowing second coat to dry. 

Step 6

If you are not satisfied with color (i.e. it’s still too light), apply a third coat of stain and again wait 6-8 hours.  Once you are satisfied with stain color and it has been given ample time to dry, you are now ready to apply polyurethane as the finishing coat.

Step 7

Using your second clean rag, wipe on a light coat of your Minwax Wipe On Polyurethane.  Be sure not to get any polyurethane on surrounding walls, etc.  Polyurethane will be visible on walls if you’re not careful.

Step 8

After about 2 hours of letting the polyurethane dry, apply a second coat if you wish.  Again, make sure to protect wall paint, furniture, etc.  A second coat is not required so if you’re happy with the end result, feel free to forgo it!

Please let us know in the comments below or by email how your project turned out! We love pictures!  If you need further assistance and you live near the La Plata or San Juan County area, don’t hesitate to call for an in-person estimate!  Of course, you can always shoot us an email if you don’t live in the area and need further advice.

Make Your Front Door Look Brand New – DIY Varnishing

Living in high elevation areas like Durango; we know that our homes are exposed to harsh elements.  The sun beats on the exterior of our homes a little harder because of the higher altitude (closer proximity to sun).  Not only that, but the snow that lives in our yard a quarter of the year causes moisture issues and magnifies sun that much more.  If your once beautiful door could use a little tender loving care, maybe varnish is the answer.  Varnish can not only make a dull-looking door look new by enhancing the color, but it can offer protection from rain, wind, snow and sun.  So take two minutes to learn how to varnish your front door yourself!

diy-varnishing-blog

Materials you will need for the project:

220 grit sanding paper or fine grit sanding sponge

Mineral spirits

3 rags

Touch up stain

1 roll of 1 1/2 inch masking tape

1 roll of 12 inch masking paper or newspaper

2 spray cans of Minwax Spar Varnish Satin Oil Based (made specifically for wood – more moisture and UV protection)

Optional: Tack cloth or Shop Vac with hose attachment for more efficient dusting


Do It Yourself Varnishing

Step 1

Using a clean rag and a tiny bit of mineral spirits (enough to dampen the rag, but not leave it dripping wet), clean the door.  A good method is to put the rag over the opening of the bottle and tilt the bottle to the side.  Do this in three or four spots to make sure you have enough on the rag.

Step 2

Scuff sand the doors with a fine grit sanding sponge.  This is just a light sanding by hand to remove defects in the coating and also help break down the previous coating to make the new coating adhere better.

Step 3

Touch up stain with an interior oil-based stain like Minwax Wiping Stain.  Color does not have to be perfect.

Step 4

Cover any glass, door handles, threshold and surrounding trim/siding with masking paper or newspaper.  Remove weather stripping (Usually pulls right off – if not, cover with tape).

Step 5

Clean the door again with a touch of mineral spirits and a rag.

Step 6

Spray a light coat of Minwax Spar Varnish Satin (I prefer the oil-based).  Make sure the door is closed when spraying so additional protection is not necessary.

Step 7

Wait 2 hours or until the door is dry to the touch.  Lightly sand the door to make it smooth.

Step 8

Clean sanding dust with a rag with a little mineral spirits once again.

Step 9

Apply second coat.  You can do three coats if you’re an over-achiever, but make sure you sand and clean prior to the third coat

Step 10

Lastly, unmask and enjoy.

Special notes: If expecting weather or wind, you should wait to varnish or risk the appearance of debris in your finish.